Introducing the features of a SharePoint site
Introducing the features of a SharePoint site
| Applies to |
| Microsoft Windows® SharePoint® Services technology in Microsoft Windows Server™ 2003 |
Has your team recently added a Web site based on Microsoft Windows SharePoint Services? If so, you may be wondering how to start collaborating and sharing information with your teammates. This article is designed to help you get started, by introducing you to the features and capabilities of a team site based on Windows SharePoint Services. It introduces the basics of each feature and points you where to go in the site to start using the feature.
This article focuses on the Team Site template, which is the default site template in Windows SharePoint Services. A team site makes it possible for teams to create, organize, and share information quickly and easily. It includes a document library and basic lists such as Announcements, Events, Contacts, and Links.
Note: Each "Try it" section in this article shows you where to go in a team site to start using a feature. You should be successful getting started using each feature by following the steps of a "Try it" section. However, for the full set of steps required to use any feature, consult Windows SharePoint Services Help. To start Help, click Help from any page in your team site.
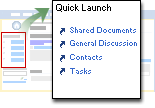
In following the steps described in this article, you will use two user interface elements of SharePoint sites that you may not be familiar with: the Quick Launch bar and the list toolbar. The Quick Launch bar contains hyperlinks to specific pages on your team Web site.
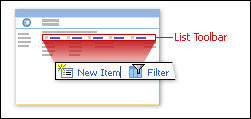
The list toolbar provides hyperlinks to pages that contain forms for adding and editing items in the lists, document library, and discussion board.
Manage information
SharePoint sites are great for storing information such as event calendars, contacts, Web links, discussions, issues lists, and announcements. In addition to using the rich set of built-in lists, you can create custom lists in your team site that meet your team's specific information-sharing needs.
Contacts lists
Use a contacts list to communicate with the people with whom you work. You can enter names and contact information (such as telephone number, e-mail address, and street address) so that everyone on your team can use this information. You can copy contact information from your address book to a contacts list (requires a Windows SharePoint Services-compatible address book program, such as Microsoft Office Outlook® 2003, and Microsoft Internet Explorer 4.0 or later), and you can copy or link contacts from a contacts list to your address book.
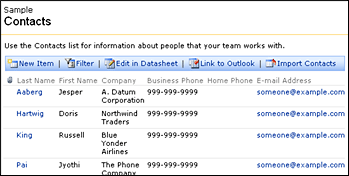
Try it: Your team site comes with a built-in Contacts list. On the Quick Launch bar, click Contacts to view the list. To add a new contact to the Contacts list, click New Item on the lists toolbar.
Note: You can also find all lists in your site by clicking Documents and Lists on the top link bar.
Links lists
You can use links lists to post hyperlinks to Web pages of interest to your team.
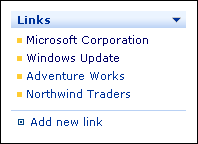
Try it: Your Team Site comes with a built-in Links list, and a view of this list is inserted on your site's home page. To add a new link, click Add new link.
Lists and spreadsheets
If you have a list of information in a spreadsheet, you can define a range of cells to use as a list in your site. Windows SharePoint Services imports the data from the spreadsheet and displays it the same way it displays the built-in lists: in columns that team members can filter and sort, with commands that enable team members to add, edit, and delete items. To import data from a spreadsheet, you must have a Windows SharePoint Services-compatible spreadsheet program, such as Microsoft Office Excel 2003, and Internet Explorer 5 or later installed.
If you have a Windows SharePoint Services-compatible productivity program installed, such as Microsoft Office Professional Edition 2003, you can view and use your lists in your team site by using datasheet view. Datasheet view allows you to quickly add, delete, and update list entries just as you would in a spreadsheet program, without having to switch to a separate program.
Try it: In the top link bar, click Create. On the Create Page page, click Import Spreadsheet. To view a list in datasheet view, on the list page, click Edit in datasheet view.
Custom lists
Team sites based on Windows SharePoint Services come with a set of built-in lists that let you share common types of information, such as tasks, contacts, and announcements. If no built-in lists meet your information-sharing needs, you can create a custom list that displays your unique information.
Try it: You create a custom list in two stages. First, on the top link bar, click Create, and specify Custom List. After you create the custom list, you can add columns. On the page that displays the list, click Modify settings and columns. For each column that you want to add, in the Columns section of the Customize page, click Add a new column.
Share files
Windows SharePoint Services provides your team site with document storage and retrieval, with check-in and check-out functionality, version history, custom properties, and flexible, customizable views. Your team members can easily find and share documents and other files.
Document libraries
Document libraries are collections of files that you share with team members. For example, you can create a library of documents for a specific project. You can store any type of file in a document library.
Windows SharePoint Services enables users to search all Web site content on a site, including documents in document libraries. If search is enabled on your server, your site's home page and list view pages contain search boxes.
Note: Search is only available for Windows SharePoint Services with Microsoft SQL Server 2000. If your Web server is running Microsoft SQL Server 2000 Desktop Engine (Windows) (WMSDE), search is not available. If you are unsure whether or not search is available, check with your server administrator.
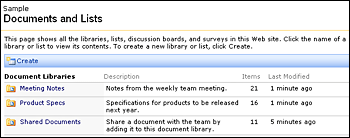
Try it: By default, your team site comes with a built-in document library named Shared Documents, which is listed on the Quick Launch bar as well as on the Documents and Lists page. To add a document, open the document library and click Upload Document, and then browse to the document to add. If you use a client program compatible with Windows SharePoint Services, such as Microsoft Office Word 2003, you can save files to the document library from the client program.
Picture libraries
Picture libraries provide a simple way to share and organize digital pictures. For example, an organization could create a picture library for marketing graphics — providing a single location for team members to view, share, edit, and download corporate logos or other marketing material.
Try it: To create a Picture Library, on the top link bar, click Create, and specify Picture Library. To add a picture to a picture library, open the picture library and click Add Picture, and then browse to the picture that you want to add.
Collaborate
Your team can take collaboration to a new level with Windows SharePoint Services. Team members can easily create collaborative workspace sites to share and manage their team information. Threaded discussions, surveys, shared calendars, task lists and other collaboration features help keep you and your teammates connected and productive.
Announcements lists
Use an announcements list to post news, status, and other short bits of information you want to share with team members. You can set an expiration date for an announcement.
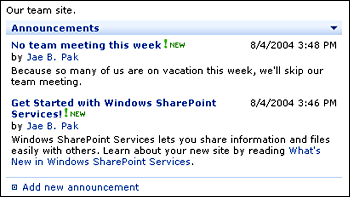
Try it: Your Team Site comes with a built-in Announcements list. A view of this list is inserted on your site's Home page. To add a new link, click Add new announcement.
Events lists
Use an events list to post information about dates that are important for your team. You can copy or link events from an events list to a calendar program that is compatible with Windows SharePoint Services, such as Microsoft Office Outlook 2003.
Try it: Your Team Site comes with a built-in Events list. A view of this list is inserted on your site's Home page. To add a new link, click Add new event.
Task lists
Use the tasks list to assign a task to a member of your team, specify its due date and priority, and indicate its status and progress. You can easily view all tasks or a selection of tasks, such as just those tasks assigned to you.
Try it: Your Team Site comes with a built-in Tasks list. On the Quick Launch bar, click Tasks to view the list. To add a new task to the list, click New Item from the list's toolbar. To view just those tasks assigned to you, in the Tasks list, click Filter and, in the Assigned To field, click your name.
Discussion boards
Discussion boards provide a forum for conversing about topics that interest your team. For example, you could create a discussion board for team members to propose and discuss team activities. Each discussion board appears on a page that includes buttons for starting new discussions, sorting and filtering discussions, switching to a different view of the discussion board, and changing the design of the discussion board.
Try it: Your team site comes with a built-in discussion board named General Discussion, which is listed on the Quick Launch bar as well as on the Documents and Lists page. To start a new discussion, from the General Discussion page, click New Discussion.
Surveys
Surveys provide a way of polling team members. You can configure a survey so that team members can respond once or multiple times. You can optionally display results in a graphical view.
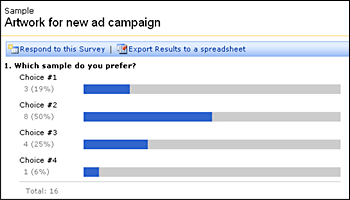
Try it: To create a survey, on the top link bar, click Create, and then click Survey. Type a name and description for your survey and click Next to start adding questions.
Meeting Workspace sites
A Meeting Workspace site is a Web site for centralizing all the information and materials for one or more meetings. Before the meeting, use a workspace site to publish the agenda, attendees list, and documents you plan to discuss. During or after the meeting, use the workspace site to publish the meeting results and track tasks. Use meeting requests to invite people to the meeting. In the meeting request, include a hyperlink that goes to the workspace site where invitees can learn the details and see the materials.
If the Create Subsite right is assigned to your site group, you can create a Meeting Workspace site. (You have the Create Subsite right automatically if you are a member of the Administrator site group.)
Try it: On the top link bar, click Create and, on the Create page, click Sites and Workspaces. Enter a title, description, and URL, and then click a permission setting. Click Create. On the Template Selection page, click Meeting Workspace in the Template box.
Document Workspace sites
A Document Workspace site is a SharePoint site that is centered around one or more documents. Colleagues can easily work together on a document — either by working directly on the Document Workspace site copy or by working on their own copy, which they can update periodically with changes that have been saved to the Document Workspace site copy.
If the Create Subsite right is assigned to your site group, you can create a Document Workspace site. (You have the Create Subsite right automatically if you are a member of the Administrator site group.)
Try it: On the top link bar, click Create, and, on the Create page, click Sites and Workspaces. Enter a title, description, and URL, and click a permission setting. Click Create. On the Template Selection page, click Document Workspace in the Template box.
Customize
Team sites based on Windows SharePoint Services are useful right out of the box. However, if you are a member of the Web Designer or Administrator site groups, you can customize your site, changing its appearance and adding functionality without using other applications or doing any programming.
Pages
You don't have to be a professional Web site designer or software developer to customize your Web site created in Windows SharePoint Services. By using built-in Web Part features, you can easily customize your site's home page and you can customize Web Part Pages that are stored in your site.
A Web Part is a modular unit of information that forms the basic building block of a Web Part Page. When you create a team site based on Windows SharePoint Services, a set of Web Parts is available to you that display lists, images, text, and other content. By adding these Web Parts to Web Part pages, configuring them, and connecting them together, you can create dynamic information portals that present information to your site's users in an organized and convenient way. For example, you can change the picture on your site's home page, or you can add a view of a list on your Home page.
Try it: On the Modify Shared Page menu of your Home page, point to Add Web Parts, and then click Browse. Drag any Web part from the Web Part List into a zone on your home page.
Personal views
A Web Part Page, such as your site's home page, is always in one of two views: shared view or personal view. When a Web Part Page is in shared view, all users see the same page and any changes you make in shared view will appear for all users. When a Web Part Page is in personal view, any personal changes you have made appear and any changes you make in this view are intended just for you. In personal view, for example, you can change the height and width of one Web Part, close another Web Part, add a third Web Part, and delete a fourth Web Part. These changes apply only to your view of the page.
Try it: On the Modify Shared Page menu of your Home page, click Personal View. Any modifications to the page you make in this view will not appear for other viewers of the page.
Themes
A theme is a unified set of design elements that influence the fonts and color scheme of your SharePoint site. Changing your site's theme is an easy way to customize your site to fit your team's personality.
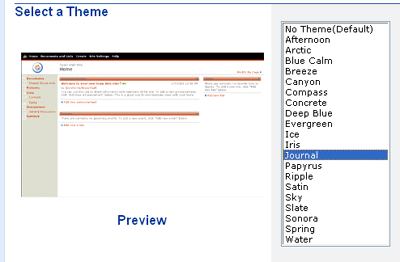
Try it: On the top link bar, click Site Settings. On the Site Settings page, in the Customization section, click Apply theme to site. On the Apply Theme to Web Site page, select a theme.
Alerts
You can add alerts that notify you by e-mail of any changes in the content of your Web site. You can create alerts for lists and libraries, as well as for individual items and any files in them. When you create an alert for a list or library, you can specify the kinds of changes that you want to track. For example, you can have the server alert you when an item or file is added, modified, or deleted. Alerts for files and list items notify you when the file or item is updated or deleted. For documents in libraries, you can be notified when comments in Web Discussions have been added, deleted, or edited.
Try it: From any list or document library page, in the Actions list, click Alert Me.
Work with Office applications
Deep integration with Office 2003 programs lets your team members collaborate by using the familiar tools they use every day. Here are some of the ways you can use Office 2003 programs with your team site:
-
Save documents to document libraries from Office Excel 2003, Office Outlook 2003, Microsoft Office PowerPoint® 2003, Microsoft Office Visio® 2003, or Office Word 2003.
-
Use Microsoft Office Access 2003 or Office Excel 2003 to view and edit data stored in lists on your team site.
-
Synchronize your Office Outlook 2003 calendar and contact lists with your team site.
-
Create a Document Workspace site from Office Word 2003.
Try it: Open a document in Office Word 2003, Office Excel 2003, Office PowerPoint 2003, or Microsoft Office Visio 2003. On the Tools menu, click Shared Workspace. In the Shared Workspace task pane, click or type the Web address (URL) of a Web site based on Windows SharePoint Services where the Document Workspace site will be located. (The Document Workspace site will be created as a subsite of the site, so you must have permission to create Document Workspaces site at this Web site.) Click Create.
Note: The example companies, organizations, products, domain names, e-mail addresses, logos, people, places, and events depicted herein are fictitious. No association with any real company, organization, product, domain name, email address, logo, person, places, or events is intended or should be inferred.