Add users and domain to Office 365
Add users and domain to Office 365
To set up Office 365 to use your domain and add your users, use the Office 365 setup wizard. You have two options for setting up your domain:
-
Custom domain – You can bring your existing domain (like contoso.com) or buy a new domain to use with Office 365.
-
Initial domain – If you'd rather keep using the domain you got when you signed up for Office 365, you can do that (learn more about the onmicrosoft.com domain). You don't have to verify and set up a custom domain unless you want to use your own domain name for email in Office 365
If domain setup looks a little technical, don't worry. It usually only takes about 15-20 minutes, and we'll walk you through, step-by-step. If you need help, you can always talk to Support.
Watch the video below for an overview, or just log in to Office 365 and go to the setup wizard to dive in.
Video overview

Step 1: Verify your domain in Office 365
You need to verify that you own your domain before you can use it with Office 365. This ensures that no one else can use services or send email that appears to come from your business domain.
Click here for instructions
-
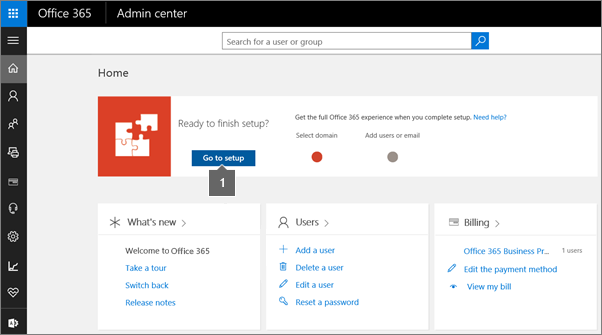
Choose Go to setup on the Office 365 admin center to start the wizard. (Be sure to sign in to Office 365 first.)
-
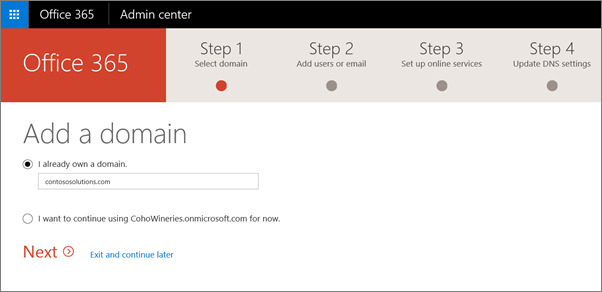
Add the domain you want to use.
-
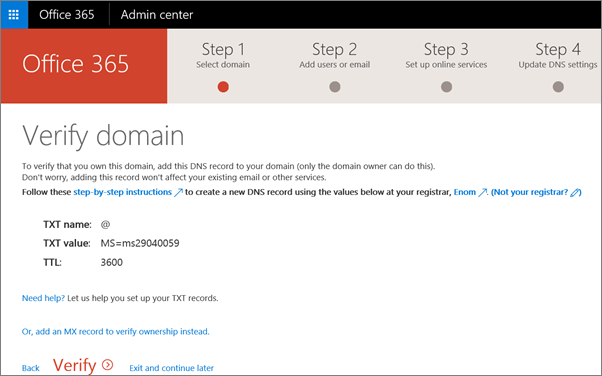
Follow the steps in the wizard to enter your custom domain name, and then add the record that verifies that you own the domain.
Step 2: Add ALL users who have email that use your domain
IMPORTANT: By updating your domain's MX record in the next step, ALL email sent to that domain will start coming to Office 365. Make sure you've created mailboxes in Office 365 for everyone who has email on your domain BEFORE you change the MX record. Otherwise, they'll lose any email sent to them at your domain when you switch email for the domain over to Office 365.
Click here for instructions
-
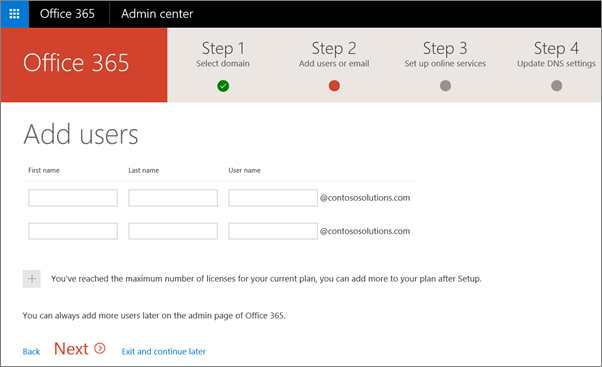
After you've verified your domain, you'll also be prompted to add anyone who has an email address at your domain. You can choose to switch from the initial onmicrosoft.com domain to your custom domain instead for sign-in and email.
Make sure you add your own email address here, if you get mail at your domain.
-
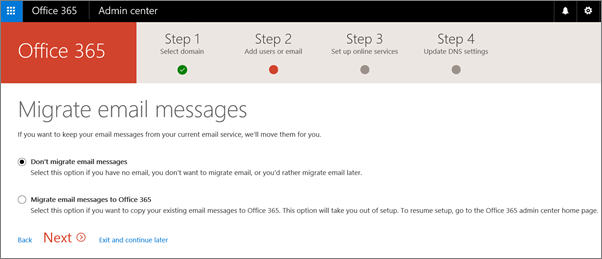
You'll also be prompted to migrate email from your previous email server. You can do it now, or later.
If you are moving from another email provider and want to copy your data later, you can follow these steps to copy your email and other data.
Step 3: Set up email and other Office 365 services with your domain
The final step is to set up your Office 365 services, including switching email for your domain to Office 365.
Click here for instructions
To finish, you have to update some records at your DNS host or domain registrar.
The setup wizard tells you exactly which records to update, including the values you'll need for each one, and guides you through the steps.
You have two choices for setting up services with your domain:
Set up my online services for me. (Recommended) Change your domain's nameserver (NS) records at your domain registrar to point to Office 365 nameservers. A good option unless you already have a website that you're using with your domain.
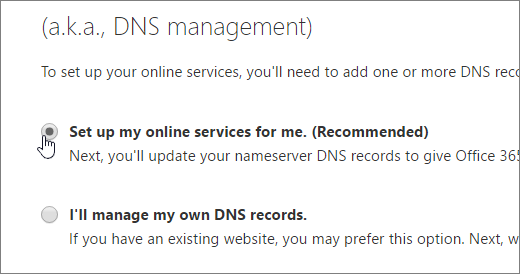
The setup wizard typically detects your registrar and gives you a link to step-by-step instructions for updating your NS records at the registrar website. Or follow these general steps for changing NS records. Then Office 365 will automatically set up email and other services for you.
This changes your domain's DNS hosting to Office 365 (not recommended if you have a website with your domain, like www.contoso.com).
I'll manage my own DNS records. With this option, you'll go to your DNS host website and set up the records yourself, including the MX record for email.

For detailed instructions about how to create DNS records for Office 365, including the MX record required for mail routing, check the dropdown menu for your DNS hosting provider.
If you don't know the DNS hosting provider or domain registrar for your domain, see Find your domain registrar or DNS hosting provider.
- Select your registrar
- 1&1 Internet
- 123-reg.co.uk
- Aabaco Small Business
- Active24
- Amazon Web Services (AWS)
- Asia Registry
- Blacknight
- Bluehost
- Cloudflare
- Crazy Domains
- DNSMadeEasy
- DomainExplorer.com
- Domain Monster
- DotPH
- Dreamhost
- Dyn.com
- Dynadot
- eNomCentral
- Europe Registry
- Fasthosts.co.uk
- Freeparking.co.nz
- Gandi.net
- GoDaddy
- Google Domains
- Heart Internet
- Hostgator
- Hover (Tucows)
- iFastNet
- IP Mirror
- Melbourne IT
- MyDomain
- myhosting.com
- name.com
- Names.co.uk
- Namecheap
- NearlyFreeSpeech.net
- Net4.in
- Netfirms
- Nettica
- Network Information Center (NIC)
- Network Solutions
- NoIP
- Register.com
- Register365
- TransIP
- United Domains
- Domain managed by Google (eNom)
- Domain managed by Google (Go Daddy)
- Whiz.in
- Yahoo! Small Business
- Azure DNS zones
(An automated option is available.)
Continue setting up?
Back to: Set up Office 365 for business


