Add additional email aliases to a user in Office 365
Add additional email aliases to a user in Office 365
A user can have more than one email address associated with their Office 365 for Business account. These additional addresses are called aliases.
For example, let's say Ina's primary email address is Ina@Contoso.com. She also wants to receive email at Ina.Leonte@Contoso.com and Sales@Contoso.com. You can create those aliases for her, and all the mail sent to those aliases will go to Ina's Inbox.
You can create up to 200 aliases for a user. No additional fees or licenses are required.
Tip: If you want multiple people to manage email sent to a single email address like info@contoso.com or sales@contoso.com, create a shared mailbox. To learn more, see Create shared mailboxes in Office 365.
Add email aliases in the Office 365 admin center
You must have admin permissions in Office 365 to do this.
-
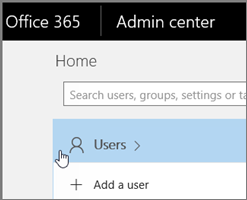
Go to the Office 365 admin center.
-
Select Users.

-
On the Active users page, choose the user.

-
On the user's page, next to User name / Email, choose Edit.

-
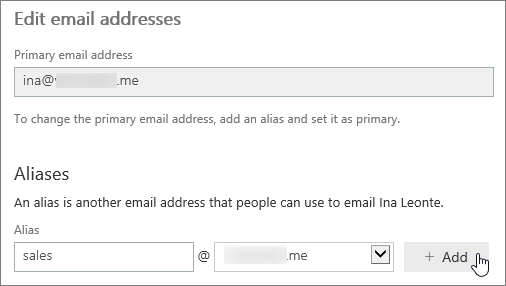
On the Edit email addresses page, in the text box under Alias, type the first part of the new email alias. If you added your own domain to Office 365, you can choose the domain for the new email alias by using the drop-down list. Then choose Add.
Note: The email alias must end with a domain from the drop-down list. To add another domain name to the list, see Adding additional domains to Office 365.

-
When you're done, choose Save.
-
Wait 24 hours for the new aliases to populate throughout Office 365.
The user now has a primary address and an alias. All mail sent to Ina@contoso.com and Sales@contoso.com will go to Ina's Inbox.

-
When the user replies, the From address will be her primary email alias.. For example, let's say a message is sent to Sales@Contoso.com, and it arrives in Ina's inbox. When Ina replies to the message, her primary email address will appear as the sender, not Sales@Contoso.com.
Set as primary email address or remove email address in the Office 365 admin center
You must have admin permissions in Office 365 to do this.
-
Select Users.

-
On the Active users page, choose the user.

-
On the user's page, choose Edit.

-
On the Edit email addresses page, do one of the following:
-
To set an email alias as the primary address, choose Set as primary next to it.
-
To remove an email alias, select the alias, and choose Delete
 .
.
-
-
When you are done, choose Save.
Add email addresses in the old Office 365 admin center
You must have admin permissions in Office 365 to do this.
-
Go to Admin > Users > Active users.
-
On the Active users page, do one of the following:
-
Click or tap to select the user, and then click Edit next to the user's Primary email address.
-
Select the check box next to the user, click Edit
 , and then click the Email address tab.
-
-
On the Edit email address tab, under Other email addresses, click Add new. Type the first part of the new email alias. If you added your own domain to Office 365, you can choose the domain for the new email alias by using the drop-down list.
Note: The email alias must end with a domain from the drop-down list. To add another domain name to the list, see Adding additional domains to Office 365.
-
Click Add.
-
When you're done, click Save.
Set as primary email address or remove email address in the old Office 365 admin center
You must have admin permissions in Office 365 to do this.
-
Go to Admin > Users > Active users.
-
On the Active users page, do one of the following:
-
Click or tap to select the user, and then click Edit next to the user's Primary email address.
-
Select the check box next to the user, click Edit
 , and then click the Email address tab.
-
-
On the Edit email address tab, do one of the following:
-
To set an email address as the primary address, select the email address, and click Set as primary . Click OK to confirm that you want to set as primary email address.
-
To remove an email address, select the email address, and click Delete.
-
-
When you are done, click Save.
Do you have the Office 365 Small Business plan?
If you subscribed to the Office 365 Small Business (which is no longer available for purchase), when you create a user account, an email address is automatically assigned to the account based on the user name. This address is known as the "primary" or "reply" address. It is the email address that displays in the From box of messages sent from the account. For information about how to change a user's user name and primary email address in the Office 365 Small Business plan, see Change a user name in Office 365.