Record a slide show with narration and slide timings
Record a slide show with narration and slide timings
Audio narrations and timings can enhance a web-based or self-running slide show. If you have a sound card, microphone, and speakers, you can record your PowerPoint presentation and capture your voice narrations, slide timings, and ink and laser pointer gestures.
For information about recording narration in PowerPoint for Mac, see:
Note: Recording narration is not available in PowerPoint Online. If you have a desktop version of Office, click Edit in PowerPoint in your desktop program to follow the procedures described in this article. If you don't have a desktop version of Office, you can try or buy the latest version now.
-
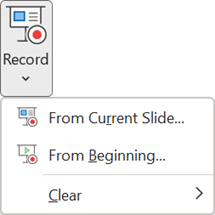
With your presentation open, on the Recording tab, click the Record Slide Show down arrow.
-
Pick one:
-
Start Recording from Beginning
-
Start recording from Current Slide
-
Clear
Caution: Clear is grayed out unless you have previously recorded some slides. Be careful when choosing Clear, as you can permanently delete your narrations or timings.
-
-
The slide show opens in Presenter view, with buttons at the top left for starting, pausing, and stopping the recording. Click the round, red button when you are ready to start the recording.

-
The current slide is shown in the main pane of Presenter view. On the right side of the view, a smaller preview pane shows the next slide and any notes associated with your current slide.
-
Navigation arrows on either side of the current slide allow you to move to the previous and next slides.
-
PowerPoint automatically records the time you spend on each slide, including the times of animation steps and the use of any triggers on each slide.
-
You can record your voice as you run through your presentation. (The Settings tool near the top right of the window allows you to determine whether sound is included in your recording.) If you use the pen, highlighter, eraser, or laser pointer, PowerPoint will record those for playback as well.
Important: If you re-record your narration (including audio, ink, and laser pointer), PowerPoint will erase your previously recorded narration (including audio, ink, and laser pointer) before you start recording again on the same slide.
You can also re-record by going to Slide Show tab > Record Slide Show.
-
-
You can pick a pointer tool (pen, laser pointer, eraser, or highlighter) from the array of tools just below the current slide. There are also color selection boxes for changing the color of the ink. (Eraser is grayed out unless you have previously added ink to some slides.)
-
To end your recording, right-click the final slide, and click End Show.
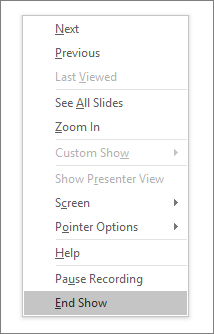
Tips: When you finish recording your narration, a sound icon appears in the lower-right corner of your slides.
The recorded slide show timing is automatically saved and the slide show appears in Slide Sorter view with timings beneath each slide.

Preview the recorded slide show
On the Slide Show tab, click From Beginning or From Current Slide.
Note: During playback, your animations, inking actions, laser pointer, audio and video will play in sync.

Preview the audio narration
In Normal view, click the sound icon in the lower, right corner of the slide, and then click Play.
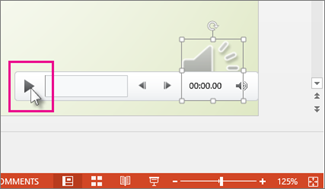
You can pause playback while previewing the audio.
Set the slide timings manually
PowerPoint will automatically record your slide timings when you add narrations or you can manually set the slide timings to accompany your narrations.
-
In Normal view, click the slide that you want to set the timing for.
-
On the Transitions tab, in the Timing group, under Advance Slide, select the After check box, and then enter the number of seconds that you want the slide to appear on the screen. Repeat the process for each slide that you want to set the timing for.
Tip: If you want the next slide to appear either when you click the mouse or automatically after the number of seconds that you enter — whichever comes first — select both the On Mouse Click and the After check boxes.
Turn your narrations, ink, and laser pointer off
After you've rehearsed your PowerPoint presentation and saved the narrations, audio, and ink and laser pointer for your slide show, those timings will be saved with your presentation. But you can turn them all off if you want to view the slide show without them.
On the Slide Show tab, uncheck the Play Narrations box.
Turn slide timings off
After you've rehearsed your PowerPoint presentation and saved the timings for your slide show, those timings will be saved with your presentation. But you can turn them off so the slides don't automatically advance without your pressing the button first.
On the Slide Show tab, uncheck the Use Timings box.
See also
Turn your mouse into a laser pointer
-
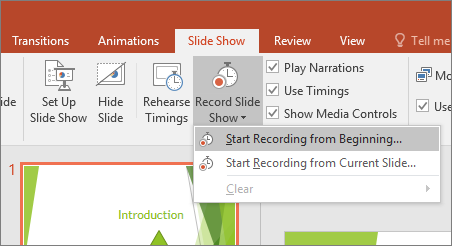
With your presentation open, on the Slide Show tab, click the Record Slide Show down arrow.
-
Pick one:
-
Start Recording from Beginning
-
Start recording from Current Slide
-
Clear
Caution: Clear is grayed out unless you have previously recorded some slides. Be careful when choosing Clear, as you can permanently delete your narrations or timings.
-
-
In the Record Slide Show box, check or clear the boxes for your recording, and click Start Recording.
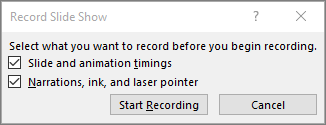
Tips: More about these options:
-
Slide and animation timings: PowerPoint automatically records the time you spend on each slide, including the times of animation steps and the use of any triggers on each slide.
-
Narrations, ink, and laser pointer: Record your voice as you run through your presentation. If you use the pen, highlighter, eraser, or laser pointer, PowerPoint will record those for playback as well.
Important: Pen, highlighter, and eraser recording are available only if you have the February 16, 2015 update for PowerPoint 2013 or a later version of PowerPoint installed. In earlier versions of PowerPoint, pen and highlighter strokes were saved as ink annotation shapes.
-
-
At the top left corner of the slide, you can use the Recording toolbar to:

-
Go to the next slide -

-
Pause the recording -

-
Re-record the current slide -

Important: If you re-record your narration (including audio, ink, and laser pointer), PowerPoint will erase your previously recorded narration (including audio, ink, and laser pointer) before you start recording again on the same slide.
You can also re-record by going to the Slide Show tab > Record Slide Show.
-
-
To use ink, eraser, or the laser pointer in your recording, right-click the slide, click Pointer options, and pick your tool:
-
Laser Pointer
-
Pen
-
Highlighter
-
Eraser
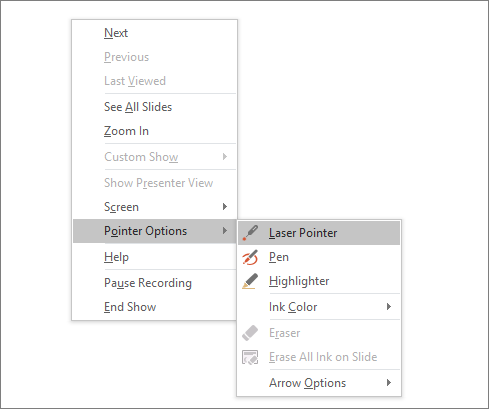
Notes:
-
Eraser is grayed out unless you have previously added ink to some slides.
-
To change the color of the ink, click Ink Color.
-
-
To end your recording, right-click the final slide, and click End Show.

Tips: When you finish recording your narration, a sound icon appears in the lower, right corner of your slides.
The recorded slide show timing is automatically saved and the slide show appears in Slide Sorter view with timings beneath each slide.

Preview the recorded slide show
On the Slide Show tab, click From Beginning or From Current Slide.
Note: During playback, your animations, inking actions, laser pointer, audio and video will play in sync.

Preview the audio narration
In Normal view, click the sound icon in the lower, right corner of the slide, and then click Play.

Set the slide timings manually
PowerPoint will automatically record your slide timings when you add narrations or you can manually set the slide timings to accompany your narrations.
-
In Normal view, click the slide that you want to set the timing for.
-
On the Transitions tab, in the Timing group, under Advance Slide, select the After check box, and then enter the number of seconds that you want the slide to appear on the screen. Repeat the process for each slide that you want to set the timing for.
Tip: If you want the next slide to appear either when you click the mouse or automatically after the number of seconds that you enter — whichever comes first — select both the On Mouse Click and the After check boxes.
Turn your narrations, ink, and laser pointer off
After you've rehearsed your PowerPoint presentation and saved the narrations, audio, and ink and laser pointer for your slide show, those timings will be saved with your presentation. But you can turn them all off if you want to view the slide show without them.
On the Slide Show tab, uncheck the Play Narrations box.
Turn slide timings off
After you've rehearsed your PowerPoint presentation and saved the timings for your slide show, those timings will be saved with your presentation. But you can turn them off so the slides don't automatically advance without your pressing the button first.
On the Slide Show tab, uncheck the Use Timings box.
See also
Turn your mouse into a laser pointer
What would you like to do?
Learn more about using narration in a slide show
You can record a narration before or during a slide show and include audience comments in the recording. If you don't want narration throughout the presentation, you can record comments only on selected slides or turn off the narration so that it plays only when you want it to play.
When you add a narration to a slide, a sound icon  appears on the slide. As with any sound, you can either click the icon to play the sound or set the sound to play automatically.
To record and hear a narration, your computer must be equipped with a sound card, microphone, and speakers.
Before you start recording, PowerPoint 2010 will prompt you to record either just the slide timings, just the narrations, or both at the same time. You can also set the slide timings manually. Slide timings are especially useful if you want the presentation to run automatically with your narration. Recording slide timings will also record the times of animation steps and the use of any triggers on your slide. You can turn the slide timings off when you don't want the presentation to use them.
Record a narration before or during a slide show
-
When you record a narration, you run through the presentation and record each slide. You can pause and resume recording any time.
-
Ensure your microphone is set up and in working order prior to recording your slide show.
-
On the Slide Show tab, in the Set Up group, click Record Slide Show
 .
. -
Select one of the following:
-
Start Recording from Beginning
-
Start Recording from Current Slide
-
-
In the Record Slide Show dialog box, select the Narrations and laser pointer check box, and if appropriate, select or deselect the Slide and animation timings check box.
-
Click Start Recording.
Tip: To pause the narration, in the Recordingshortcut menu, click Pause. And to resume your narration, click Resume Recording.
-
To end your slide show recording, right click the slide, and then click End Show.
-
The recorded slide show timings are automatically saved and the slide show appears in Slide Sorter view with timings beneath each slide.
Preview a narration
-
In Normal view, on the slide, click the sound icon
 .
. -
On the ribbon, under Audio Tools, on the Playback tab, in the Preview group, click Play.
Record comments on a slide
-
In Normal view, click the slide that you want to add a comment to.
-
On the Insert tab, in the Media group, click the arrow under Audio, and then click Record Audio.
-
To record the comment, click Record, and start speaking.
-
When you are finished recording, click Stop.
-
In the Name box, type a name for the sound, and then click OK.
A sound icon
 appears on the slide.
Set the slide timings manually
PowerPoint 2010 will automatically record your slide timings when you add narration or you can manually set the slide timings to accompany your narrations.
-
In Normal view, click the slide that you want to set the timing for.
-
On the Transitions tab, in the Timing group, under Advance Slide, select the After check box, and then enter the number of seconds that you want the slide to appear on the screen. Repeat the process for each slide that you want to set the timing for.
Tip: If you want the next slide to appear either when you click the mouse or automatically after the number of seconds that you enter — whichever comes first — select both the On Mouse Click and the Automatically After check boxes.
Turn the slide timings off
Turning off the slide timings does not delete them. You can turn the timings back on at any time without having to recreate them. However, when the slide timings are turned off, your slides will not automatically advance when you record a narration, and you will need to manually advance the slides.
-
In Normal view, on the Slide Show tab, in the Set Up group, click Set Up Slide Show.
-
Under Advance slides, click Manually.
Tip: To turn the timings back on, under Advance slides, click Using timings, if present.
See also
What would you like to do?
Learn more about using narration in a slide show
You can either record a narration before you run a presentation or record a narration during a presentation and include audience comments in the recording. If you don't want narration throughout the presentation, you can record comments only on selected slides or turn off the narration so that it plays only when you want it to play.
When you add a narration to a slide, a sound icon  appears on the slide. As with any sound, you can either click the icon to play the sound or set the sound to play automatically. Voice narration takes precedence over other sounds, and only one sound can play at a time in a presentation. As a result, other sounds that are set to play automatically in a presentation are overridden by a narration and will not play. However, sounds that are set to play when clicked will still play when you click them.
To record and hear a narration, your computer must be equipped with a sound card, microphone, and speakers.
Automatic slide timings and narration
As you record your narration, Microsoft Office PowerPoint 2007 automatically records the amount of time that you take on each slide. You can choose to save these slide timings with the narration when you are prompted to do so, or you can set the slide timings manually. Slide timings are especially useful if you want the presentation to run automatically with your narration. You can turn the slide timings off when you don't want the presentation to use them.
Embed or link a narration
You can either link or embed a narration.
-
When you embed a narration, the narration sound file becomes part of the presentation and travels with it, resulting in a larger file size for the presentation.
-
When you link a narration, the file size of the presentation is smaller, because the sound file is stored outside the presentation. You specify a location on your hard disk drive for the narration, and the sound file plays with the presentation. If you give the presentation on a different computer, you must move the linked sound file to that computer. The best way to move a presentation and its linked files is to use the Package for CD feature. Or you can manually update the links on the second computer by deleting the narration and then adding back the narration sound file before you deliver your presentation.
In addition, when you link narrations, you can go back later and edit the sound files by using a sound editing program.
Tip: Accompany the narration with slide notes. Because audiences have different needs and computer equipment, consider accompanying your narration with notes. Notes can benefit anyone who is hearing impaired or whose computer lacks a sound card. If you save your presentation as a Web page (.htm) file, the notes will appear beneath each slide as it is displayed. If you save the presentation as a presentation (.pptx) file, the audience can print the notes, or you can print the notes for them.
Record a narration before a presentation
When you record a narration, you run through the presentation and record on each slide. You can pause and resume recording.
-
In Normal view, select the slide that you want to start the recording on.
-
On the Slide Show tab, in the Set Up group, click Record Narration
 .
.
-
Click Set Microphone Level, follow the directions to set your microphone level, and then click OK.
-
Do one of the following:
-
To embed the narration, click OK.
-
To link the narration, select the Link narrations in check box, click Browse, click a folder in the list, and then click Select.
-
Tip: To prevent possible problems, use the same folder that your presentation is saved in.
-
If you selected the first slide to begin the recording on, go to step 6.
If you selected a different slide to begin the recording on, the Record Narration dialog box appears. Do one of the following:-
To start the narration on the first slide in the presentation, click First Slide.
-
To start the narration on the currently selected slide, click Current Slide.
-
-
In Slide Show view, speak the narrative text into the microphone, and then click the slide to advance to the next slide. Follow this process for each slide that you want to add narration to.
Tip: To pause or resume the narration, right-click the slide, and then on the shortcut menu, click either Pause Narration or Resume Narration.
-
Click the black Exit screen.
-
The narration is automatically saved, and a message appears asking if you want to save the timings for the presentation as well. Do one of the following:
-
To save the timings, click Save. Your slides appear in Slide Sorter view, with the slide timings shown below each slide.
-
To cancel the timings, click Don't Save. (You can record the timings separately.)
-
Note: Voice narration takes precedence over other sounds, and only one sound can play at a time in a presentation. As a result, other sounds that are set to play automatically in a presentation are overridden by a narration and will not play. However, sounds that are set to play when clicked will still play when you click them.
Preview a narration
-
On the slide, click the sound icon
 .
. -
Under Sound Tools, on the Options tab, in the Play group, click Preview, or double-click the sound icon.

Re-record part of a narration
-
In Normal view, select the slide that you want to start re-recording on.
-
On the Slide Show tab, in the Set Up group, click Record Narration
 .
.
-
Do one of the following:
-
If you already tested your microphone, click OK.
-
To test your microphone, click Set Microphone Level, follow the directions to set your microphone level, and then click OK.
-
-
If you selected the first slide to begin recording again, go to step 5.
If you selected a different slide to begin recording again, the Record Narration dialog box appears. Do one of the following:-
To start the narration on the first slide in the presentation, click First Slide.
-
To start the narration on the currently selected slide, click Current Slide.
-
-
In Slide Show view, record the narration for the slide, and then do one of the following:
-
To stop re-recording, press ESC.
-
To continue re-recording, click the mouse to advance to the next slide, speak the narration on the slide, and then click to the next slide to continue re-recording.
-
To end the re-recording before you go through all the slides, press ESC.
-
To re-record through all the slides, when you come to the black Exit screen, click it.
-
-
The narration is automatically saved, and a message appears asking if you want to save the timings for the slides as well. Do one of the following:
-
To save the timings, click Save.
-
To cancel the timings, click Don't Save.
-
Record a narration during a presentation
If you want to capture your own comments, the comments of your audience, or both during your presentation, you can turn on narration before you begin your presentation.
-
In Normal view, select the slide that you want to start the recording on.
-
On the Slide Show tab, in the Set Up group, click Record Narration
 .
.
-
Click Set Microphone Level, follow the directions to set your microphone level, and then click OK.
-
Do one of the following:
-
To embed the narration, click OK.
-
To link the narration, select the Link narrations in check box, click Browse, click a folder in the list, and then click Select.
-
-
If you selected the first slide to begin the recording on, go to step 6.
If you selected a different slide to begin the recording on, the Record Narration dialog box appears. Do one of the following:-
To start the narration on the first slide in the presentation, click First Slide.
-
To start the narration on the currently selected slide, click Current Slide.
-
-
In Slide Show view, add your speaker comments along with any audience comments, and then click the slide to advance to the next slide. Repeat this process for all the slides in your presentation.
Tip: To pause and resume the narration, right-click the slide, and then on the shortcut menu, click either Pause Narration or Resume Narration.
-
Click the black Exit screen.
-
The narration is automatically saved, and a message appears asking if you want to save the timings for the presentation as well. Do one of the following:
-
To save the timings, click Save. Your slides appear in Slide Sorter view, with the slide timings shown below each slide.
-
To cancel the timings, click Don't Save.
-
Record comments on a slide
-
In Normal view, click the slide that you want to add a comment to.
-
On the Insert tab, in the Media Clips group, click the arrow under Sound, and then click Record Sound.

-
To record the comment, click Record, and start speaking.
-
When you are finished recording, click Stop.
-
In the Name box, type a name for the sound, and then click OK.
A sound icon
 appears on the slide.
Set the slide timings manually
Office PowerPoint 2007 will automatically record your slide timings when you add narration or you can manually set the slide timings to accompany your narrations.
-
In Normal view, click the slide that you want to set the timing for.
-
On the Animations tab, in the Transition To This Slide group, under Advance Slide, select the Automatically After check box, and then enter the number of seconds that you want the slide to appear on the screen.

Repeat the process for each slide that you want to set the timing for.
Tip: If you want the next slide to appear either when you click the mouse or automatically after the number of seconds that you enter — whichever comes first — select both the On Mouse Click and the Automatically After check boxes.
Turn the slide timings off
Turning off the slide timings does not delete them. You can turn the timings back on at any time without having to recreate them. However, when the slide timings are turned off, your slides will not automatically advance when you record a narration, and you will need to manually advance the slides.
-
In Normal view, on the Slide Show tab, in the Set Up group, click Set Up Slide Show.

-
Under Advance slides, click Manually.
Tip: To turn the timings back on, under Advance slides, click Using timings, if present.
